

Once we had completed our roof repairs the next logical step for the Victorian project was to start diagnosing damp problems in a number of rooms. The damp situation in our house was not horrific but there were a number of patches in various places that needed attention. The worst affected space was the main living room. This is unfortunately the room that we wanted to decorate first and the real the centre piece of the house. With no prior knowledge of how to fix damp in Victorian houses we did exactly what you are doing now and spent many an hour scouring the internet looking for guidance. This article discusses some of the damp issues that we have faced and the resolutions applied. It also highlights the key causes of damp in Victorian houses.
What is the Victorian Project all about? Find out here.
Diagnosing Damp Problems – Our Journey
A few words of warning. When we bought our house we were lead to believe that it riddled with damp. On purchase we had a RICS accredited building survey done and were told that it had the dreaded ‘rising damp’ and that the only way to resolve this would be expensive chemical injection courses and even building work. Let me start by saying that this information we received here was utter BS. You may be in the same boat as us and are looking for alternative less intrusive solutions. [See also: 10 ‘Gotchas’ when buying a Victorian House – Knowledge is Power]
Knowing what we know now it is clear that our surveyor knew very little about how houses of the Victorian era work and really he was just executing a script that he applies to every survey carried out. He came to the ‘rising damp’ conclusion based on findings collected using an electric moisture reader. These devices are inherently flawed as they do not measure moisture at all, they measure conductivity. There are many things on the surface of a wall that can conduct electricity, water is just one. The truth is that the so called ‘rising damp’ is a complete myth and is something invented by those selling expensive damp solutions. Every patch of moisture in our house was rectified with simple inexpensive actions.
Chemical Injection Course On Victorian Houses
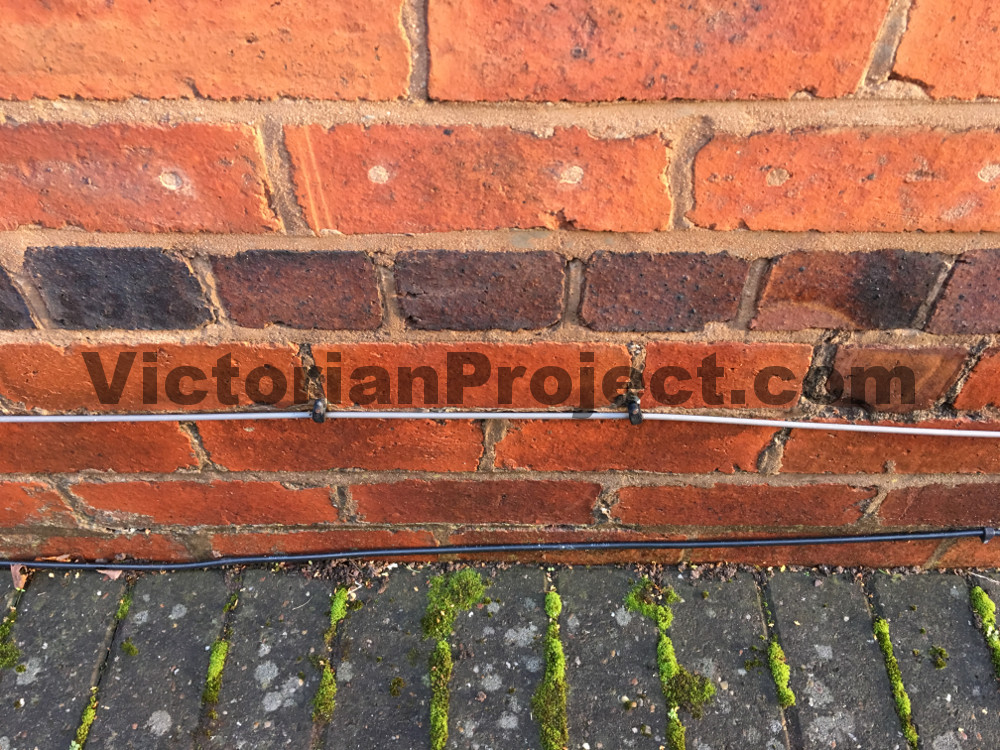
Before I go any further there is an important point I would like to make…. It was clear when we purchased our property that a chemical injection treatment had been completed on it. You may notice on your property that at around a foot from ground level there is a single row of bricks that differs in colour to all others. This is shown in the image below. Just above this row of bricks you can see a series of round holes that have been filled. This was an attempt at a chemical injection course that had been done by the previous owners. [See also: Should I Get A Building Survey & Are House Surveys Worth It?]
I want to stress right now that you should NEVER have a chemical injection course done on any Victorian property (or any other property for that matter!). Victorian houses and more or less anything that was constructed pre 1950s were built with breathability solutions throughout their design. Developers accepted that it was too difficult to block all moisture out from a property and so instead allowed airflow to disperse it. Porous materials were used in different places to allow excess moisture to be absorbed and expelled under different conditions. The whole thing works as a system and a chemical injection course will disrupt this system! Having a damp proof course in Victorian houses is simply the wrong thing to do.
The Affects Of Chemical Injection On Victorian House
Lime based mortars, plasters and other building materials are designed to allow moisture to pass through them. A non-porous chemical injection course will prevent this from happening. You may find that the problem is simply moved to another area. Worse still the chemical injection course could result in a build-up of moisture causing plaster to break on the wall. You will be advised by many so called damp specialists that a chemical injection course is the only way forward to resolve your damp issues but this is a con. You will see clauses in their quotations that suggest that it only has a 30% chance of working. Every patch of damp will have a specific cause.
Diagnosing damp problems is the route to take and it t is far better to find and remove causes than to try to block them out.
Start Diagnosing Damp Problems -Types Of Damp
In our quest to rid our Victorian house of damp there were really two areas that we needed to address. Firstly, Penetrating Damp. This is where moisture enters the property from outside usually through faults or damage. Examples of this include; slipped off roof slates, failed brick pointing, inadequate drainage systems and gutters etc. Secondly, Cold Spots. These are slightly different to this and is where a particular area of a room is colder than elsewhere in the space providing a prime location for water condensation. You will often find these at the base of walls and although no moisture is coming through your brickwork it is where vapor from the air will settle giving the appearance of damp. To rid our house of damp and to give that warm homely feel we needed to address both areas.
Causes Of Damp In Victorian Houses
In all honesty we went about diagnosing damp problems in the wrong order trying to focus on some of the bigger areas first. I recommend that you start with the simpler items first and watch your damp problems slowly disappear. I have ordered our damp causes and resolutions below in this fashion. So without further ado lets look at how to fix damp in Victorian houses and the strategies we took to get there. [See also: Main Living Room Transformation (Before) -Decorating Begins]
Condensation – Moisture From The Air
Many people (including us!) will immediately assume they have huge penetrating damp problems when in fact the space is full of condensation. At first glance wet patches could be seen on walls and wall paper coming away from the plaster. More often than not this can be the result of condensation build up rather than more sinister damp causes. Condensation occurs in colder areas of a room where the reduced temperature causes vapour to turn back into liquid. There are many ways you can reduce condensation build up and you should do these from the off.
- Ensure Rooms are Well Ventilated – Open doors when you are not using rooms and open windows for a period of time to get some air flow. Do this when you first move into the property!
- Heat Your Rooms – If a room is never heated in a Victorian house the temperature will drop significantly and provides the perfect breeding ground for condensation. I’m not saying run up a huge heating bill but avoid closing off rooms completely from heat.
- User Breathable Decorating Materials – This is something to bear in mind throughout your Victorian House renovation quest. Condensation becomes an issue when water gets stuck behind none porous decorating products such as wall paper or gypsum plaster. As this moisture builds up it will force the wall paper or plaster away from the wall. If you use a breathable paint on top of traditional lime plaster the condensation can come and go without leaving a trace.
Wall Paper Causing Damp At The Edges
If you are not planning on having wall paper in a room that shows signs of damp then take it down straight away. It’s fair to say that the Victorians loved their wall paper. There were many extravagant designs and during this era you would not have found any plain painted plaster walls. This however is somewhat odd. As we have discussed Victorian walls were plastered using lime based products allowing for breathability and to promote movement of moisture. The problem here is that they then covered these breathable walls with non-breathable wallpaper! Strange right? [See also: Remove Stubborn Wallpaper – Stripping Back]
What you find with wallpaper is that condensation can build up around loose parts of the paper. As the moisture grows and gets further behind the paper it has nowhere to escape causing visible damp spots. These days you can find breathable wall papers. Unfortunately we have found that the selection is poor and they are on the expensive side. To ensure full breathability you would also need to use a fully breathable wall paper paste. If you are experiencing moisture build up in small areas of your wall paper ensure that is it properly secured to the plaster. Better still opt for a breathable paint. We used the breathable clay paint range by Earthborn. If you are planning to have painted walls then take the wall paper down immediately and see if your damp patches disperse long before you decorate.
Blocked Guttering – Over Spill To The Ground Below
Now for the first of the external damp causes. When we first bought our property it never occurred to us that one of the prime causes of damp in Victorian Houses, particularly in lower level rooms could be attributed to the guttering way up three stories high but it most certainly can. Your gutters are designed to take excess water away from the property. If they are inefficient this water can pop up in unexpected places.

Firstly, ensure your gutters are free from debris. With the age of Victorian properties many reside in areas rife with trees. During the autumn months the guttering can become packed with leaves. I suggest that you have your gutters professionally cleared once a year and this is fairly inexpensive. As this is an activity that won’t be done by you I suggest that you get this booked early on your damp fixing list. Secondly ensure that your gutters feed into the drainage system with no leaks or spillages. This can be done with a thorough visual check on a day of heavy rain. [See also: Ivy Invasion – Removal from Bricks, Roofing & Gutters]
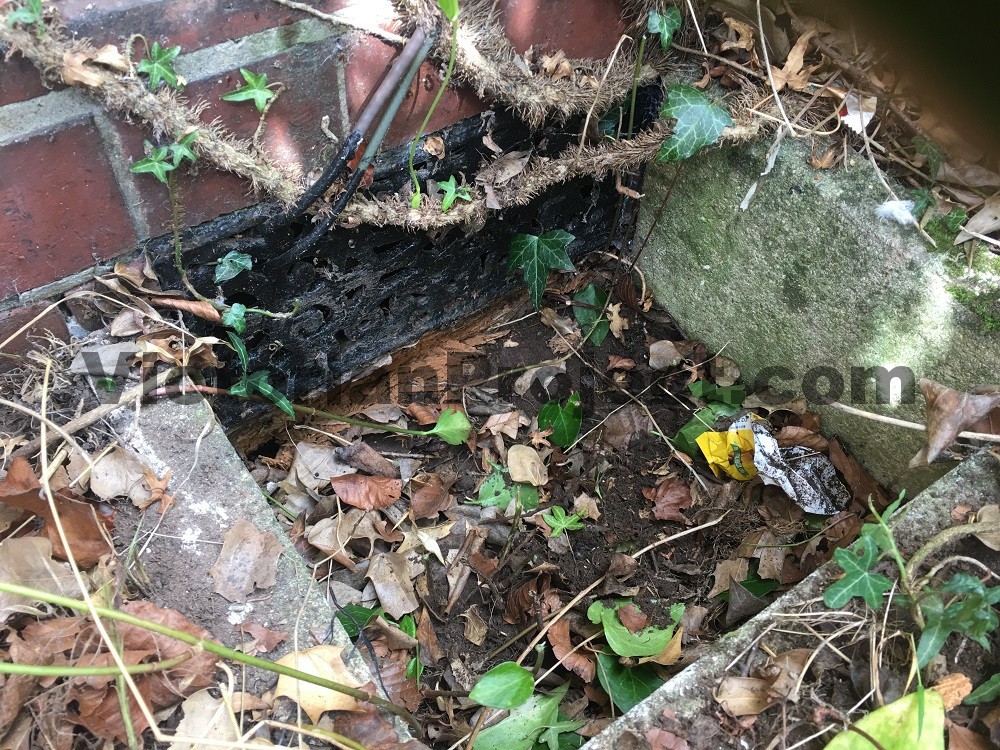
The Impact of Blocked Gutters on our Property
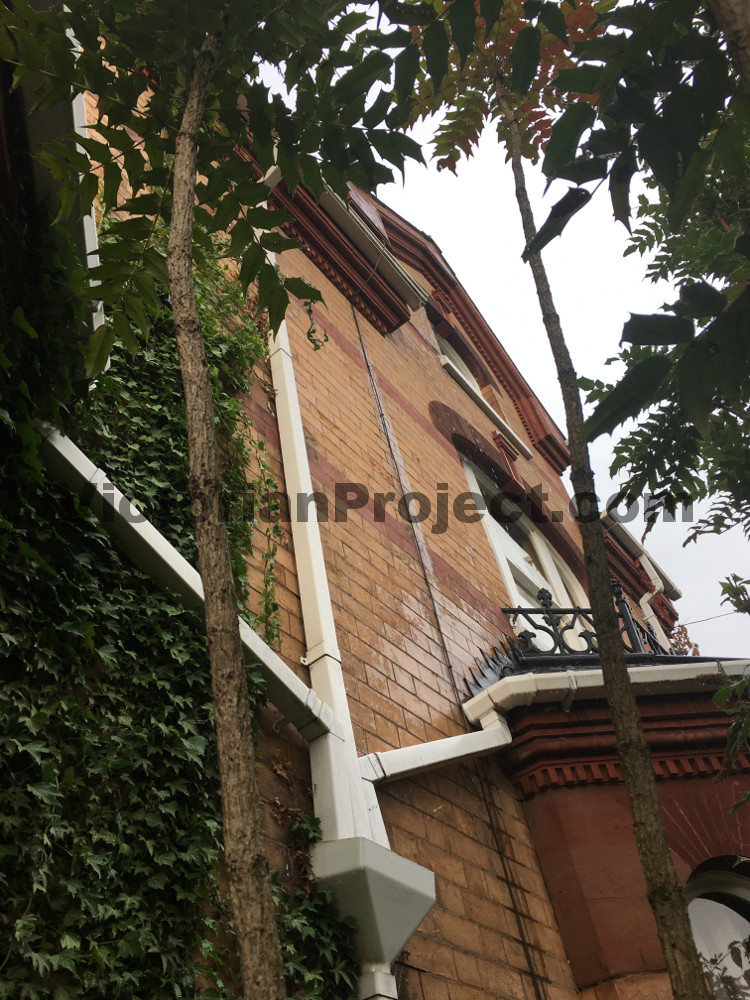
On our Victorian property the guttering on the top floor was the primary cause of damp in the main living room. I have tried to show this from the image above but it is tricky to see. The top gutter was blocked with leaves and on a rainy day water could be seen flowing over the side. This water then spilled onto the ground below and entered the cellar. The result of this is shown in the below image. This meant puddles in the lowest space of the house. When this water then evaporated from the cellar it had only one route it could take. Up into the living room above. This was a relative quick fix and once we had the gutters cleared within around two weeks the cellar dried out and in turn some of the living room damp spots.

Blocked Air Vents – Reduced Air Flow
If you look around your house just above the ground level you will see a number of large air vents or smaller air bricks. These are to allow air flow in and out of the property and are usually into the cellar. When one of these air vents gets blocked it is amazing how quickly an internal damp problem can arise. Vents are often blocked by accident either by piling things up in front of them or when making changes to the garden or driveway. Air vents in a Victorian house are crucial to its breathability system and must be allowed to do their job.
Make your way around your house, find where your air vents are and ensure that they are clear. Check that they are free from obstruction and not full of leaves or vegetation. Clearing debris should be an immediate activity. There is no cost and one of the causes of damp in Victorian houses that is simple to rectify. You may find an air vent blocked by house upgrades, new block paved drives or garden level changes. These can be trickier to address but you must ensure that all air vents are in operation.

We noticed that one of our air vents had been blocked by the addition of steps to the front door. Whoever built the steps used a small air brick shown above to allow the air through. The holes in this brick were completely blocked and the main air vent behind the steps was no longer in operation.
Inadequate Roof or Slipped Slates
Roofing is next on our list. When we started to look at our damp issues we had already done our roof repairs but this needs to be part of this article. Inadequate roofing urgently needs addressing but I have left it until now to discuss this due to cost. Many Victorian houses are built on 3 floors and as a result scaffolding is required to work on the roof. This unfortunately boosts the price. Damaged roofing can be one of the most obvious causes of damp. Put simply if you see a gaping hole you need to get it fixed! Roofing defects however are not always visible until you get up there and there may be some hidden nasties. [See also: Victorian Roof Repairs – Starting Point for any Renovation]

If you have higher level damp in top floor spaces such as bedrooms then get your roof checked. In our house bedrooms 4 & 5 both had wet patches from the ceiling running around a foot down the wall. The cause of this was a couple of slipped roof slates just above each room. Slipped slates are often hidden. You may need to get into your attic directly above the damp patch to gain full visibility. Victorian roof slate repairs are a simple task for any good roofer. A key step to fix damp in Victorian houses is to ensure the roof is protecting it from the elements.
Unused Chimneys & Open Fires
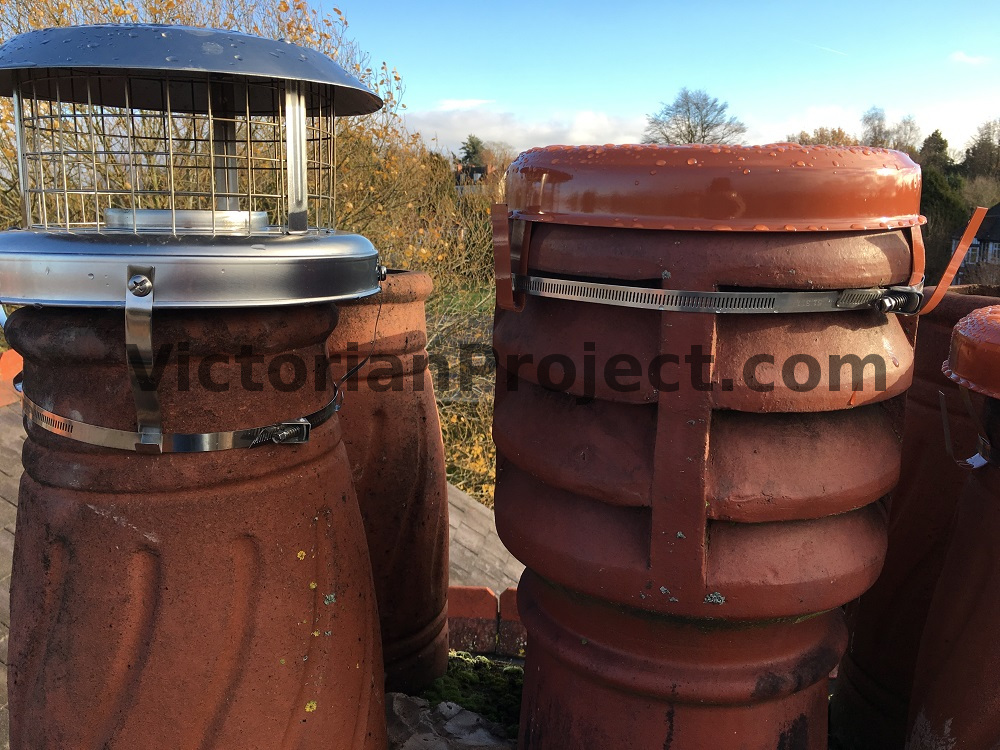
If you are getting a roofer in then whilst they are up top you can kill two birds with one stone. Unused chimneys & Open fires can be a source of moisture and draft. If you are not planning to use your chimneys then cap them off to prevent rain water entry. The photo below shows our chimneys capped off with only the one on the left in use by our log burner. If you have an unused open fires consider closing off the opening. This will prevent any moisture from within the chimney from getting into your home.
Raised Flower Beds – Touching The Property Wall
Raised flower beds may look pretty but if they are touching the walls of a property they can become a severe cause of damp! I speak from experience here. This is because the ground level is elevated and when this becomes sodden under rainy conditions this wet soil is touching the brickwork. The porous lime mortar then absorbs this water and it will start making its way into the property.
In our project a single raised flower bed was elevating the ground level by approximately 2 feet and was up against the external wall of the house. Directly adjacent to this a huge damp patch could be seen on the internal plaster in the main living room. Unfortunately, rectifying this may take some of the beauty away from your garden but in our case we had no choice but to move the soil away from the wall and to allow the water to properly run off into the ground.
Brick Pointing – Water Entry Through External Walls
Brick pointing is the layer of visible mortar you can see between the bricks on the outer wall of your property. It is there for both aesthetics and more importantly to prevent water running down the wall from entering the property. For Victorian houses the mortar used for pointing is lime based. This is very different to modern cement based mortars. It is fully breathable allowing small amounts of moisture to pass through and later be expelled under certain conditions. If you are having any brick re-pointing work done on your property then ensure that traditional lime based products are used to remain in keeping with the original breathability systems of the house.
You should re-point your brickwork if it has significantly eroded away leaving trenches that water could run into. Our case was slightly different here. At some point during its life time the outer walls at the base of the property had been re-pointed and using the incorrect modern cement based mortar. It was a real shoddy job with gaps and trenches all over the place. My 6 month old son could have done a better job! Cement based mortar is NOT breathable and when conditions are so that water would usually be expelled from a lime based product but with modern mortar it cannot escape. This can cause the water to be forced up through the bricks and it can appear as damp within your rooms. The diagram below highlights what I am talking about here. Click to zoom in.

Brick Re-pointing Practices for Victorian House
For us we had no alternative but to rake out the poor, incorrect mortar and re-point the brick work using lime. If you are in the UK we purchased the lime product from the Traditional Lime Company and they were very helpful in assisting us with our needs. We chose to re-point the bricks ourselves but any builder can do this job for you. Please note however that from our experience most builders will not have worked with lime mortars and will advise you against it. Replacing a lime mortar with a modern cement based product can make your damp situation worse. Always remain in-keeping with the original building techniques of the property. USE LIME!
Poor Surface Drainage – Non-porous Ground
Back when Victorian houses were built block paved drives were not a thing. Now they very much are and you see them all over the place. Changing the drive way with any material that is not porous can disrupt the surface drainage of the home. The photo below shows what I am talking about. At some point the block paving was put in place and built right up to the house walls. Any rain water that runs down the walls no longer has anywhere to drain and becomes a potential cause of damp. If this is an issue for you the solution is to remove the row of bricks that touches the house edge, dig a shallow trench and replace with gravel. This is known as a French Drain. This will allow this water to drain efficiently and when done right will also compliment the aesthetics of a Victorian house.

Modern Gypsum Plaster – Stopping Your Walls From Breathing
This entry in our Fix Damp in Victorian Houses guide is more of a practice to follow as you embark on your decorating journey. Unlike breathable lime plaster the common plaster products of today are cement based. They dry faster, harder and do not allow any moisture penetration. When we stripped back our living room wall paper we found that a small corner of the room had been re-plastered in recent times using gypsum plaster.
Areas of this section of the wall had cracked and in some areas come away. Lack of breathability is the likely to have caused this. If any moisture finds its way behind the plaster it has nowhere to escape. It will push the plaster outwards causing cracks or plaster to break away. If you find gypsum plaster when you remove the wall paper and you suspect it to be a cause of damp then replacing with lime may be your solution. Unfortunately lime plastering does not come cheap and adopting the right traditional plaster is one of the more costly causes of damp in Victorian houses to address. Also, plasterers with experience of lime may be hard to find in your area. To give you cost perspective we could have had the whole room done in modern plaster for the price we paid for one wall in lime.
Victorian Damp Resolutions – Roundup
In this article I have taken you though some of the common causes of damp in Victorian houses and the steps that we took to resolve them. Diagnosing damp problems is very much a trial a error process and about taking small steps to remove the issues. As stated early do not use expensive useless damp treatments. Always find and address cause rather than attempting to block it out. Victorian houses need to breath and you must allow your property to do so.
We had damp in different rooms within our house and it took us around a month to resolve all of them for a fraction of the cost of a damp treatment. This is an area that we spent a lot of time researching. What we found is that at first it can seem a tricky problem to solve but when you find a cause you kick yourself as it was glaring you in the face and somewhat obvious. ‘Rising Damp’ is a myth and for every damp patch in a Victorian home there will be a cause to unearth.
