

It is fair to say that over the years many original Victorian fireplaces have been bricked up and it is common to see a chimney breast without an opening. This is to reduce draft in favour of more efficient electric fire systems. Unfortunately this action takes away some of the real character of a room and much of its charm. We knew right from the start that we wanted a wood burning stove and to bring the fireplace back to life. Here were look at how to open up a fireplace and the steps we took to create the centre piece of our living room.
What is the Victorian Project all about? Find out here.
A sledgehammer is of course too much for knocking out the bricks obstructing your fireplace and it should be done with the right tools, care and knowhow but it is true that adding a wood burning stove can add value to your property. The 60s/70s was the period when fireplaces became less fashionable and were bricked up all across the country. Right now however they are very much back on trend with a huge increase installations over the past decade. Buyers want these and due to their popularity, many of the leading property sites suggest that a wood burning stove can add up to 5% value onto a home. Not bad for the relatively low cost of installation.
The Challenge We Faced in Restoring Bricked Up Fireplace
Two of the rooms in our house have fireplaces; the main living room and the dining room. The dining room still has the original grand installation that you simply don’t see in houses of today and is in remarkable condition. The living room fireplace however on which this article is based is another story! We were told at purchase that the house had a period where it was unoccupied. Apparently the original fireplace had been stolen during this time. How someone could steal this and get it off the wall in one piece I do not know. It had been replaced with a cheap plaster based fire surround and makeshift hearth created from an old kitchen worktop. See the image beneath. [See also: Main Living Room Transformation (Before) -Decorating Begins]
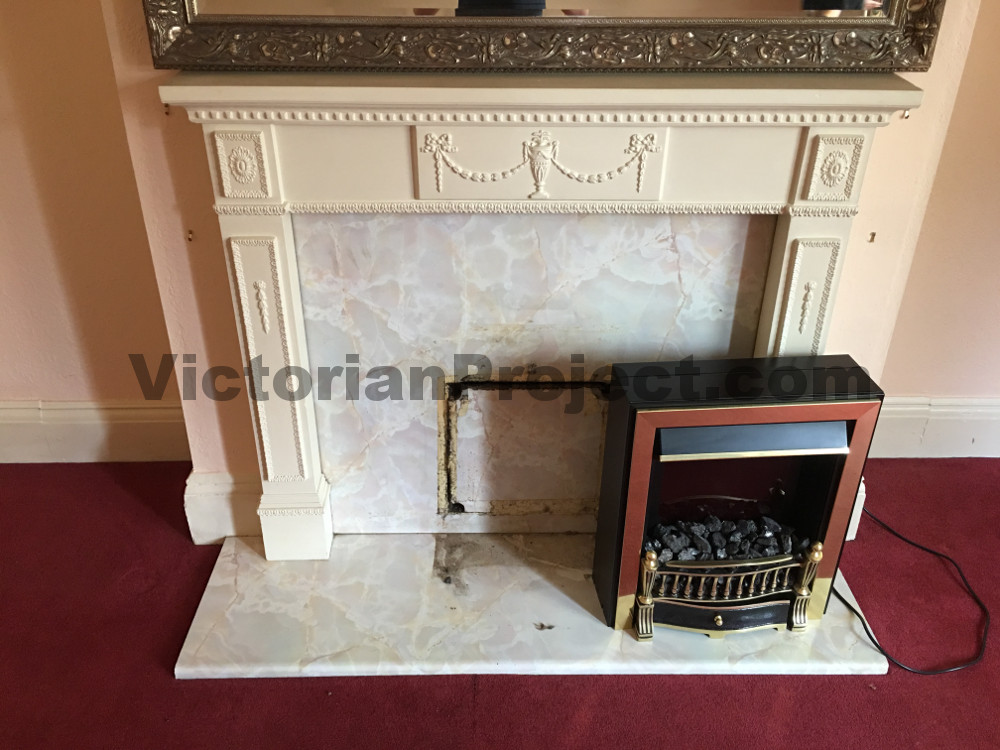
Moving the small electric fire to one side revealed a small opening allowing us to peer inside to see what lurked beneath. With the exception of this 1 foot squared hole the fireplace had been fully bricked up. Before we could even consider a log burner we needed to rip out this dodgy creation uncovering old fireplace bricks & mortar, and fully clear out the space. Our intention at this stage was to hire professionals to do the actual installation but to reduce costs we set to work on the demolition ourselves. [See also: Fix Damp in Victorian Houses and the Common Causes]
Out With The Old – Demolition Begins
When restoring bricked up fireplace installations I would certainly recommend that you only undertake this task if you know what you are doing and if not, leave it to a professional. There are a few reasons for this. If like us the actual fireplace opening is an arch you most likely require a lintel to support a number of the upper bricks and it is crucial that your new fireplace is structurally sound. Secondly a professional with the right tools will open up a fireplace in around an hour whereas it took us many days. [See also: Remove Stubborn Wallpaper – Stripping Back]
Our sarting point was to remove the old plaster fire surround. This had to be done first as it was locking in the makeshift kitchen worktop hearth and back panel. In many cases a fire surround is seated to the wall with adhesive but you may find a couple of screws buried beneath the plaster that need to come out.
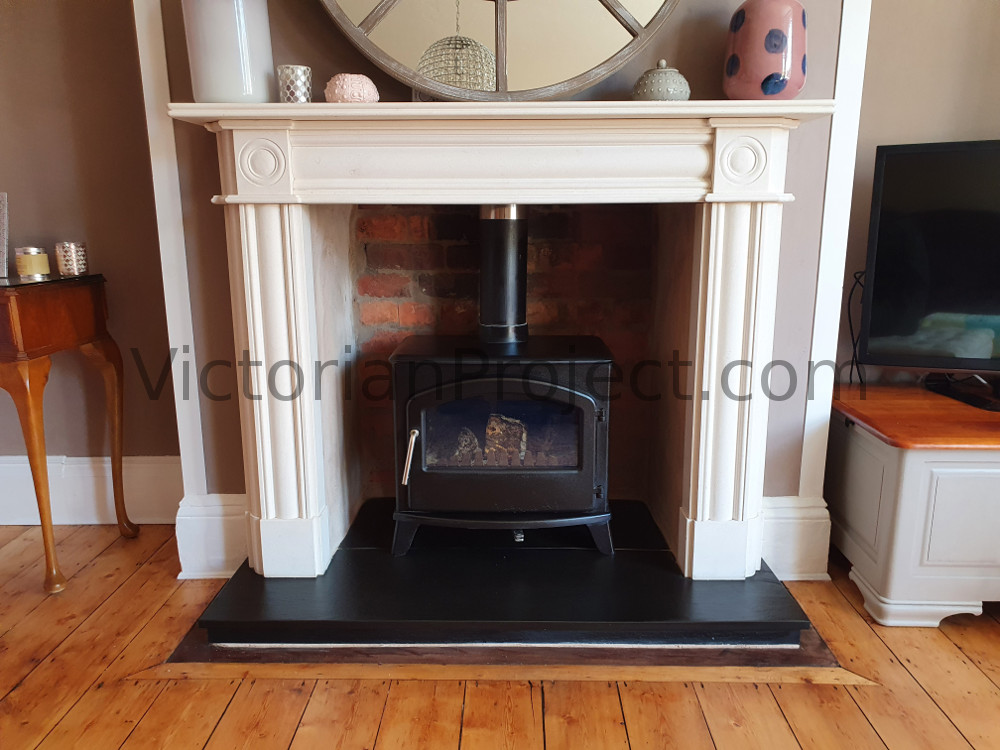
An Early Purchase – Agean Limestone Fire Surround
A slight interlude… Whilst undertaking the Victorian Project we are constantly looking at the auction sites scouring for bargains and this was certainly the case when undertaking our fireplace restoration. During the demolition phase we found an impressive looking Agean limestone fire surround in mint condition & that had never been fixed to a wall on Ebay. We checked out the retail price of the exact surround and it came in at £1250. After a little negotiation we managed to secure it for just £250 plus £25 to get it to us. I thought this worth a mention as this sort of find will provide huge savings over the duration of a project!
Breaking Down The Old Surround
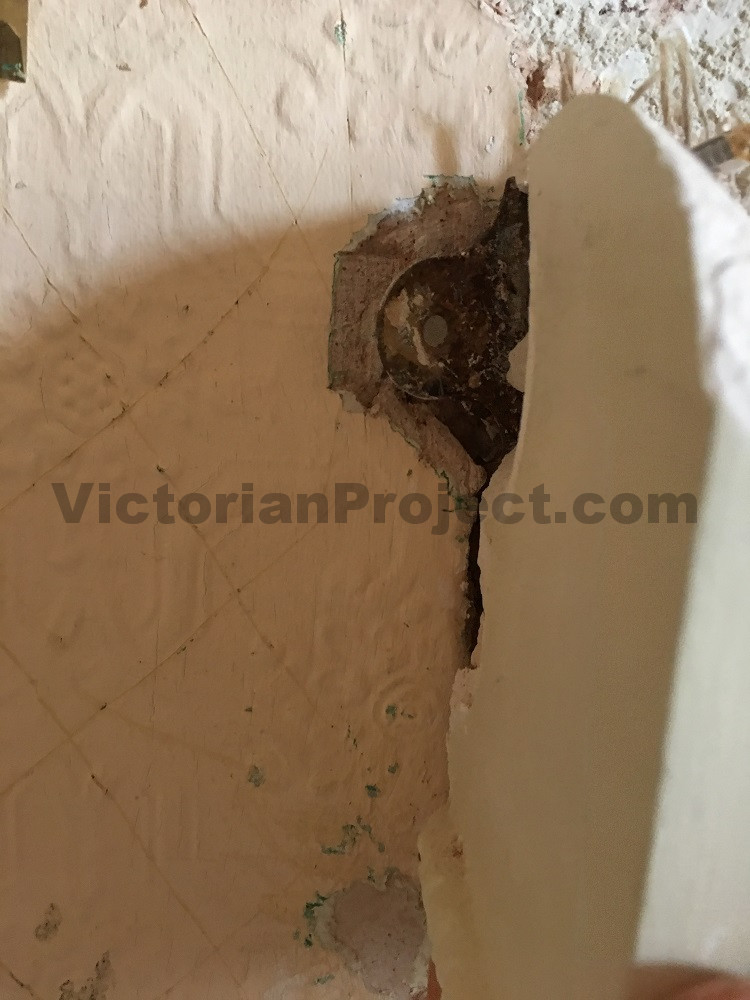
Now, back to the demolition. We started by dislodging the surround with a mallet and chisel and then with a bit of force pulled the surround outwards from the wall. A little rocking highlighted where it was most secure to the wall and the potential locations of any fastenings. We then chipped away a small part of the plaster at these locations unearthing two screws. The image below shows these screws and they were located just off the top of the surround, one on either side. [See also: Victorian Roof Repairs – Starting Point for any Renovation]
Once the surround came free the back panel shown in the first image of the article dropped off exposing the bricks. The image below shows a good few hours graft deep into the afternoon with most of the old fireplace taken away. [See also: Ivy Invasion – Removal from Bricks, Roofing & Gutters]
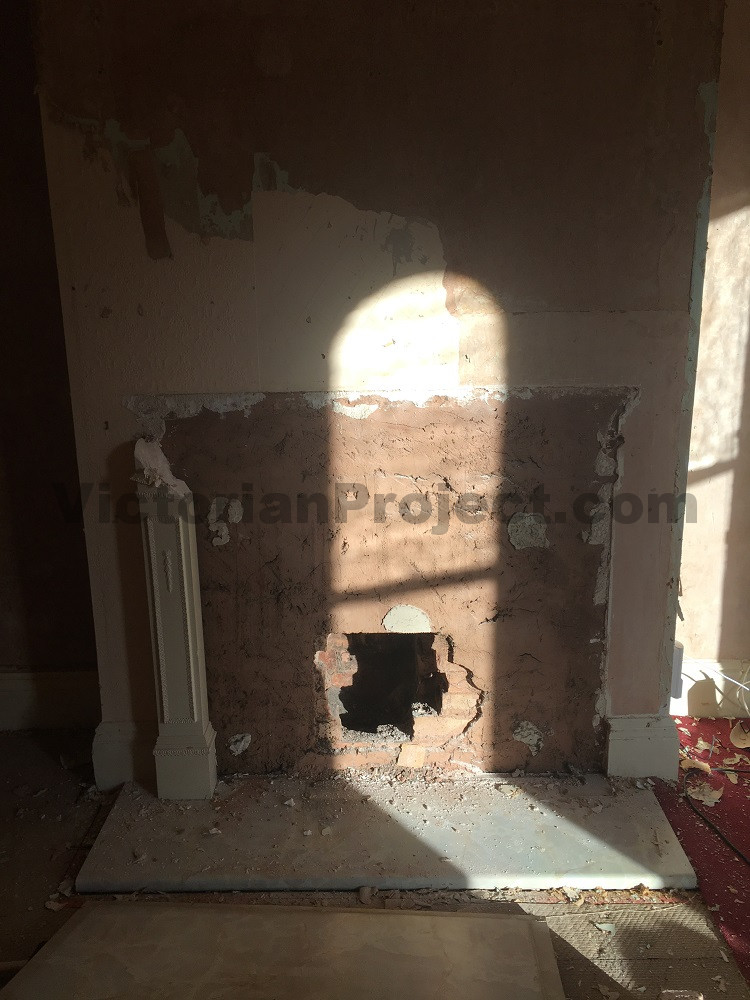
As you can see the bricks were covered in render. This would also need to be removed before we could fully break through. [See also: 10 ‘Gotchas’ when buying a Victorian House – Knowledge is Power]
Uncovering Old Fireplace & Exposing The Bricks
When restoring bricked up fireplace openings each one will be different. Before we could remove the bricks we had to break away this render entombing them. The image below shows the extent of the task with all of the fire surround & back panel removed. [See also: Should I Get A Building Survey & Are House Surveys Worth It?]
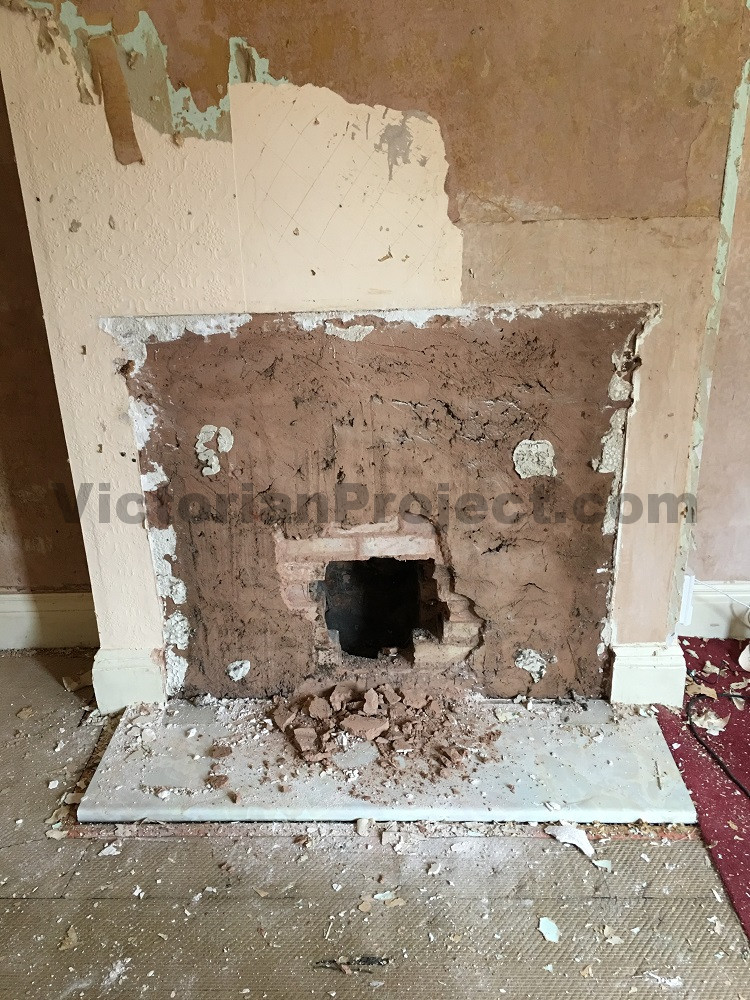
This was a straight forward but messy job. With a bucket below to catch the debris, a mallet & chisel was sufficient to do the removal. Holding the chisel at a 45 degree angle to the surface allowed the render to come off in large chunks. Within the hour all of the render was removed and we were through. We were now looking at a wall of bricks blocking what could be a stunning fireplace.
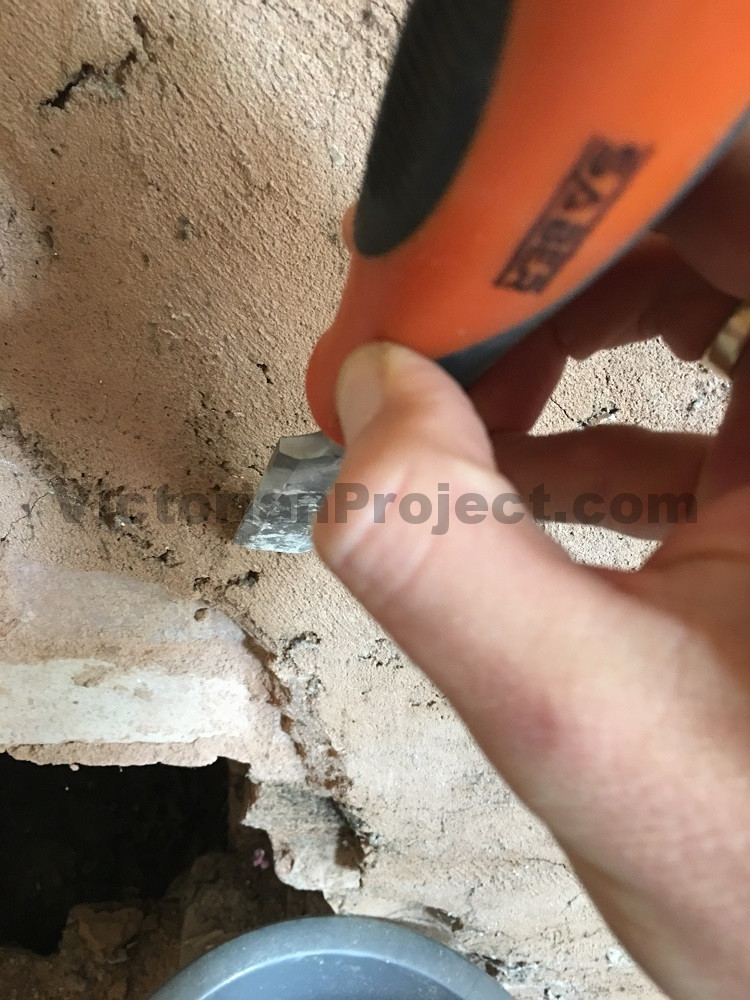
Removing The Bricks & Uncovering Old Fireplace
As stated before when it comes to actually removing the bricks to open up a fireplace, unless you know what you are doing leave it to a professional. It is messy, hard graft and you don’t want to do structural damage to your property. We did remove the bricks ourselves and it took many days to do this. As we didn’t have the best tools for the job we finished with many battered fingers.
Our fireplace is arch shaped into the chimney breast. For the log burner & surround we planned to use, we needed to remove enough of the bricks to create the space but leaving the top of the arch blocked off. We measured the height & width of our new surround & took away a rectangle of bricks to this size.

We did this by taking a mallet & chisel (again!) to the mortar between each of the bricks. Note that this is an extremely manual way of doing this. You can hire tools designed specifically for this job. It took most of a day to completely clear the opening. Again if you were to hire a builder to do this it would take little more than an hour. Once we had taken the bricks away we seated a lintel at the top of the space cutting off the arch.
In With The New – Fireplace Installation
The fireplace was now fully opened up & secure and the space was ready to take the installation of the log burner and the new surround & hearth. As this was to be the centre piece of the main room in the house we thought it time to bring in the professionals to take over. Initially we contacted a number of builders to tidy the fireplace up and to fit the surround. But we soon found this to be quite a specialist job. Most builders we engaged offered to take on the job but did not fill us with confidence that they would deliver exactly what we wanted.
Eventually we found a local company who specialise in fireplace installations. They were able to fully take over and advise us on everything required for the installation. Please note that there are clear log burner installation regulations that need to be followed and safety guidelines that you need to adhere to.
Something to be aware of is that in order to instate a log burner a flue needs to be fitted into the chimney. The company that we used came out to inspect the chimney prior to taking on the job. This was to see if it was even possible for us to have a wood burning stove. We were told that not all chimneys are suitable to take one so get yours checked prior to buying anything.
Victorina Fireplace Design & Our Plans
When restoring an old Victorian fireplace there are many options to choose from in terms of design. Our fireplace specialists were able to guide us through all of this. As mentioned we already had our Agean limestone surround purchased from Ebay. We now needed to select the fireplace interior & hearth. Inside the fireplace behind the log burner we opted for an exposed brick finish. The bricks were in good condition and so we thought it right to show them off. You do have the option here however of different types of fireboard in many different styles. Exposed brick was also the most cost affective of the available options as there is nothing to buy.
We were also asked to select from a range of hearth types. We selected a traditional slate based solely on the look of it. They range in price depending on what material it is made from. Although we went with slate, had we had our time again now that we have used the burner for a while we may have taken the granite alternative. We love the look of the slate but it does tend to show the marks and blemishes of day-to-day use. Granite is more hard wearing. The final piece to decide on was the log burner itself…
Logburner Installation & Selection
There are many wood burning stove options out there & many considerations to get it right. They vary in both price & output & come in different shapes & sizes. The output you need should be calculated based on the size of the room that you are looking to heat. A useful calculator can be found here. Logburner installation regulations dictate that any burner with an output of over 5 watts requires a vent to be added to the room to increase airflow. This can either be in the form of an airbrick or, if like us your room is built over a cellar, a hole in the floor. Please note that we are no experts in Logburner installation regulations so do your homework and read up on them. This is something that a fireplace specialist can advise you on.
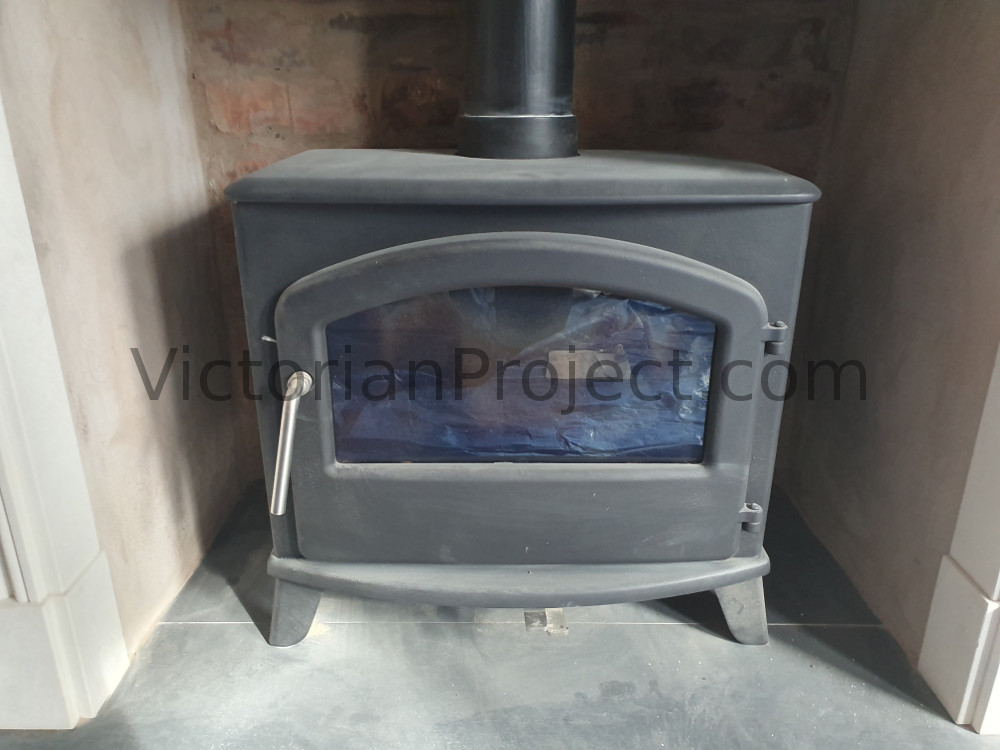
After much deliberation we selected the Boseley Serrano 7 SE multi fuel stove for our Victorian Project. This stove provided the right level of output for our room and had the right look for our space. We found the vast majority of stoves to be vertical in design and the horizontal layout of the Serrano 7 was different & better filled the fireplace opening. The Boseley Serrano 7 can be seen in the image above.
The Installation- Work Begins
So we had our surround ready to go and the Chimney specialists we used ordered in everything else required. The only other bit we needed to arrange was a scaffold tower going right up to the chimney pots to insert the flue. The full installation took a day to complete and dropping the flue was the most challenging part! The chimney itself was tight. It was touch and go at times as to whether or not the flue would actually fit. With a bit of heavy pulling from the ground level it eventually squeezed in.
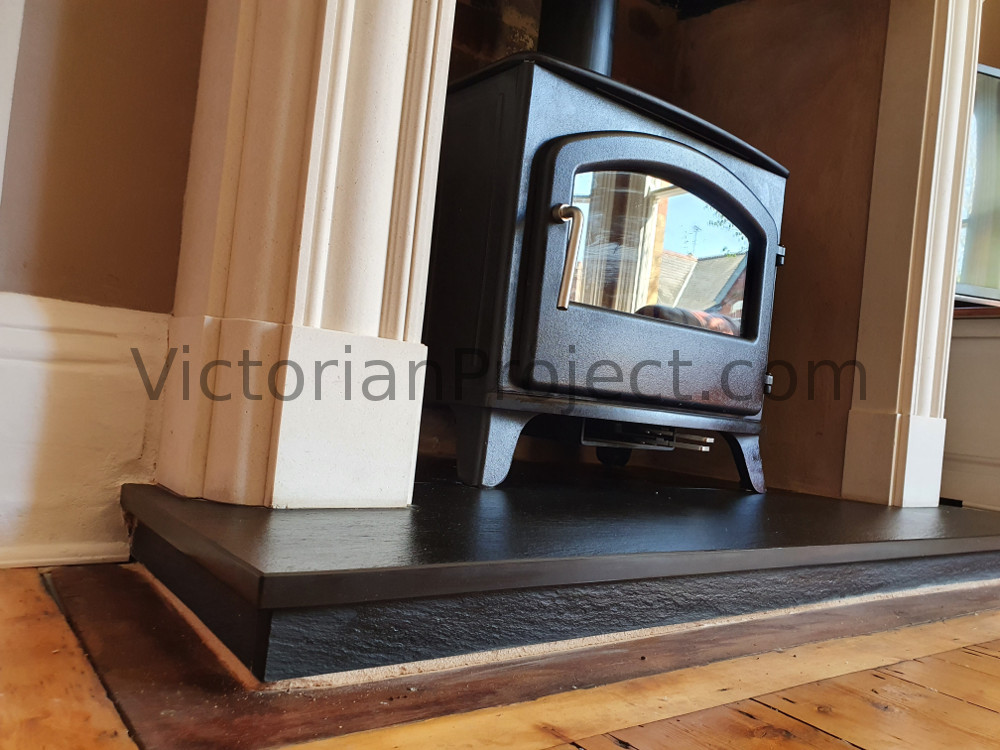
The traditional slate hearth was cut to size on site and then firmly secured into place. Next the Agean limestone surround was put into position & fixed to the wall with adhesive. It turned out that the brick work on the inner walls at either side was not in the best condition. These were rendered to provide a neater finish. Finally the exposed bricks at the rear were cleaned down to bring out their character.

And finally the Serrano 7 stove. Due to the weight of the burner it took a couple of lads to bring in and to manoeuvre into position. It was secured to the chimney flue and fixed into place. In the image above you can see a patch of render above the surround. As our fireplace opening was arch shaped the top of the arch bricks were still exposed and needed to be covered over. This would be plastered to finish it off at a later date. Bricked up fireplace restoration complete.
Reinstating A Fireplace – Roundup
Restoring bricked up fireplace setups to their former glory without doubt puts charm & character back into the room. It is how a Victorian fireplace should be and will allow you to enjoy the use of open fires & wood burning stoves on those cold winter nights. However the task can be challenging, does not come cheap and there is a lot to think about.
To unseal a fireplace you need to ensure that the structure of your chimney remains secure. If using a burner you need to see that your project adheres to logburner installation regulations. As discussed, initially we looked to builders to take on the job but there are chimney & fireplace specialists out there who are a far better option. We highly recommend that you use them. They can ensure the above and guide you through the selection of all of the materials required to get the design & heating that you want.
All of our restoring bricked up fireplace activities took a full day to complete & we were required to provide the necessary scaffolding prior to commencement. The whole task cost us just short of £3000 for all materials & works. Broken down we spent £250 plus delivery on the Agean limestone fire surround from Ebay, £200 for a single scaffold tower and then £2600 for the installation and all other materials provided by the chimney specialist. The images above show our Victorian fireplace restored to its former glory, all plastered & painted in.
