

PLASTER: A Lime Job
Finding the right lime plasterer is not easy and you should do your home work/go on recommendation. Plastering with lime is becoming increasingly less common and many of the plasterers you approach will say they don’t do it. It is both more difficult and time consuming than modern plaster and as a result costs more. A lot of the plasterers we approached said that they ‘could’ do the job but didn’t appear to have done much (if any) lime work in the past. Their quotes clearly allowed a lot of contingency. [See also: Should I Get A Building Survey & Are House Surveys Worth It?]
In the end the plasterers we hired had recently completed a lime job in a public building so we were able to go along and take a look at their work. They had the credentials and their price was fair. They required a period of 4 days to complete the job and these were not full days. The work included the complete removal of the old plaster back to the brick, a thick backing coat of lime and a finishing coat. The next section shows images from each stage of the lime plaster job. [See also: Ivy Invasion – Removal from Bricks, Roofing & Gutters]
Lime Plastering Begins
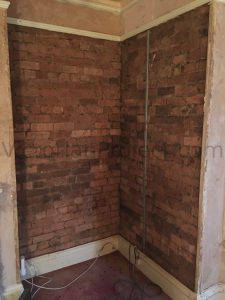
Day 1 of the lime plaster job was to take the old Victorian plaster walls right back to the brick. Removal of all of the old broken plaster was a messy job to say the least! The plaster comes down easy enough but the room looked like an explosion had taken place.
At the end of the first day the wall was ready for some fresh lime and all debris cleared away.
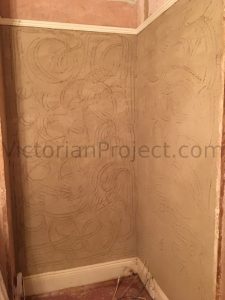
Day 2 & day 3 were used to apply separate layers of the lime plaster base coat. They were applied a number of days apart to allow the plaster to take. The image to the left shows the end result after day 3 with two layers of the lime plaster base coat applied. The scratches you can see on the surface are to provide the top coat with something to hang on to.
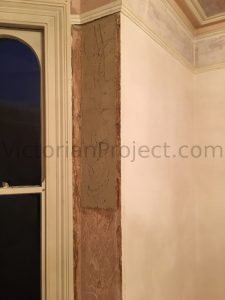
Opposite the corner on which we we having re-plastered a small area next to the window was a little worse for wear so the plasterers applied a single layer of lime plaster base coat to level it up. This would also receive a new top coat on the day 4.
This too has been scratched to ensure that the the lime top coat sits firmly in place.
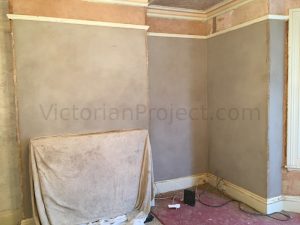
Day 4 and final day was to apply the lime finishing plaster. This is the top coat and the surface that will eventually be painted. The image below shows the finished article, the corner restored and the new fireplace nicely plastered in using breathable materials to help with the damp room. Click on the image to enlarge it and get a feel for what a new lime plaster finish looks like. [See also: Open Up A Fireplace & Log Burner Installation]
An Issue With The Plastering
For the most part we were pleased with the end result and the plasterers we hired were professional, stuck to the agreed price and were very tidy in their work. However there was one issue. Every wall corner had the original timber corner bead left in place. You cannot plaster over these as of course wood expands and contracts depending on weather conditions. These are fine left open as you can see in the image if you intend to paper but if you are painting it definitely wont look right. [See also: Broseley Serrano 7 SE Review – Our Log Burner]
If you want the plaster to run right up to the corner edges as you get in a modern house then these wooden beads need to be replaced with metal angel beads. We addressed this with the plasterers and of course it was too late. They told us that we didn’t specifically ask for this and so they were not removed. We did say that the walls would be painted so they should have put 2 & 2 together! We had to come up with a new solution for these and in the end had some custom corner beads cut, painted white which actually complimented the walls.[See also: 10 ‘Gotchas’ when buying a Victorian House – Knowledge is Power]
Go to the next page below (Page 3) to see our PUTTY activities.