

PAINT: Keeping Breathable
So at this stage we had all of the Victorian plaster walls restored and the last part of our living room wall renovation was to paint. We wanted to go for paint over wallpaper for two reasons. Firstly we simply prefer it and secondly for breathability reasons. As discussed the living room is a particularly damp space and we had now spent a lot of money on breathable lime plaster. It would be a bit of a waste to then cover it over with paper. If you are painting lime plaster you should use a breathable paint. We decided that we would paint three of the walls and create a feature wall out of the fourth using a mural.
Unfortunately if you want a breathable paint your options are rather limited and you will pay significantly more than for a standard emulsion. You really have three options; lime based paint, clay paint or a lime wash. We decided to go for a clay paint due to its consistency and coverage and Earthborn are probably the current market leader in these.
Painting Lime Plaster – Colour Selection
When deciding on which colour to go for we had three things to bear in mind to get this right.
- We planned to have exposed wooden floorboards so it must work with this colour tone. As the floorboard colour will make up a significant part of the room it must work with this.
- It must compliment the key colours of the feature wall mural. If it doesn’t then the mural will simply look odd.
- As a lime plaster finish is far less perfect than modern plaster a darker shade would better mask this.
Our main paint selection was to use Earthborn clay in the Muddy Boots colour. This would work well with the other key features of the space and would give a warm feel to the room.
To add a transition and a bit of character we decided to go white for the small space above the picture rail. This approach is popular but a word of warning here. In some cases doing this can make the ceiling feel lower and take a way some of the grandeur of the room. We thought we would give it a try and change it if it did.
Applying The Mist Coat
Whenever you are painting lime plaster (or any other plaster really) it is important to start with a mist coat. Creating a mist coat is simply taking some of your existing paint and watering it down a little. The reason it is required is that new plaster will immediately absorb the moisture from the paint and as a result it doesn’t take very well. The paint can be difficult to apply without a mist coat and you certainly won’t get as good a finish.
So, we took a portion of our Earthborn clay paint muddy boots, whipped up a mist and after a period of cutting in started rolling into the lime finishing plaster.
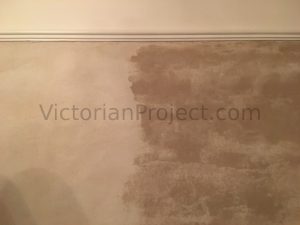
You can see above how the Earthborn Muddy Boots mist coat looked. It looks like it is hardly worth applying but it most certainly is and will allow for a far better application of the main coat.
Applying The Main Earthborn Clay Muddy Boots Coat
Once the mist coat had now been fully applied throughout the room, it was time for the main spread. This time we would be using neat Earthborn Clay and fully rolling it in to create the final finish. We started with the largest wall to get off to a good start.
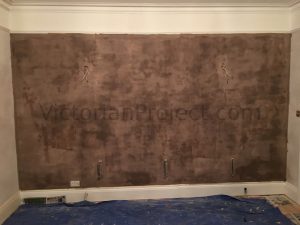
On Earthborn’s promotional material they talk about how their clay paints apply very patchy but dry evenly. This was definitely true and you can see from the images above and below that initially the walls looked like we had thrown the paint up.
After the larger wall was complete we then took to the fireplace rolling in the larger walls and using a smaller roller to tackle the fireplace sides. We took plenty of time to ensure that our new fireplace and log burner installation was fully covered up!
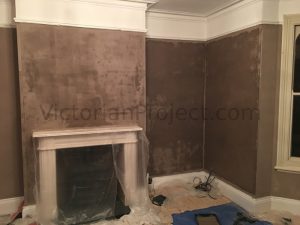
The walls once again looked very uneven/patchy and time would tell if the final finish would even out.
A Few Hours Later…
The image to the right shows the Earthborn clay paint after a couple of hours drying time and you can see that it has evened out nicely.
The image also shows the affect you get with a white colour above the picture rail against the Earthborn clay paint. As we had selected a darker colour for the main walls this small space added a little bit of extra light to the room and brightened up the area.

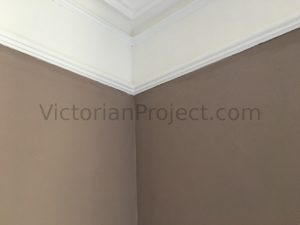
The final image above shows a closeup of the contrast between the two colours and the painted lime plaster finish. It also shows the decorative coving we needed to protect during our plastering activities.
The Living Room Wall Renovation – Roundup
Our living room wall renovation took a month end-to-end to complete. We began with the removal of tricky wall paper that had been there for decades. We then hired professional plasterers, plastered ourselves and finally delivered the painted finish.
All of the products and techniques we used for the living room had breathability in mind. This was to help to fix damp issues. This is the right way to do it but with these methods and materials now considered specialist it comes at a cost. We used lime plaster to bring original Victorian walls back into shape and then a breathable paint to finish them up nicely.
The darker shade of the Earthborn Muddy Boots colour helps to mask the rough surface of a lime plaster finish and gives off a very warm feel. The lighter transition above the picture rail gives that extra bit of light to the room. Our Victorian living room wall restoration is now complete and the space is really starting to take shape.